이전 글에서 공공 데이터 파싱을 위한 api 인증키를 얻는 법을 알아보았다.
이번에는 python으로 공공 데이터 api를 파싱 해오는 코드를 작성한 후, 사람들에게 배포할 수 있는 프로그램을 만드는 법에 대해 알아본다. 기본적으로 python IDE는 anaconda jupyter notebook으로 작성하며 사용된 버전은 3.8.8이지만 작성할 때 버전 3.6 이상이면 아무거나 사용해도 상관없을 것 같다.
사용할 라이브러리를 임포트 시킨다. 글이 더 길어지기 때문에 따로 라이브러리에 대한 설명은 없고, 구글에 검색해보면 나보다 훨씬 잘 알려주시는 고마운 분들이 쓴 글이 많으니 그것들을 참고하면 된다.
import requests
import xml.etree.ElementTree as et
from bs4 import BeautifulSoup
from lxml import html

import tkinter.filedialog as fd
from tkinter import *
from tkinter import messagebox

import os
import pandas as pd
import datetime
class를 만들고, __init__()에 만들 프로그램의 모양을 작성한다. 먼저 Tkinter 객체로 main_window를 생성해서 title(), geometry()로 제목과 크기를 설정하고 resizeable()을 사용해서 프로그램 크기를 마우스로 변경할 수 없도록 설정한다. Label에 자신이 원하는 image를 담아서 Tkinter객체에 적용시켜주면 배경을 설정할 수 있다. 그리고 파싱 해온 코로나 데이터를 save_corona 리스트를 생성하고, corona 데이터를 저장할 때 파일 이름에 현재 날짜를 포함해서 저장할 수 있도록 프로그램이 실행되었을 때의 년월일을 date에 저장한다.
import 라이브러리 추가

class read_api:
    def __init__(self):
        self.main_window = Tk()
        self.main_window.title("read api program")
        self.main_window.geometry("517x432")
        self.main_window.resizable(False, False)
        label_image = PhotoImage(file = './bg.png')
        bg_label = Label(self.main_window, image=label_image)
        bg_label.place(x=0, y=0)

        self.save_corona = []
        self.date = datetime.datetime.today().strftime("%Y%m%d")

        self.main_window.mainloop()

read_api()
코드를 실행시킨 결과는 다음과 같다.

이전 글의 사진 4에서 확인했던 인증키를 입력받을 텍스트 박스와 인증키라는 라벨을 배치한다. 그 아래에는 버튼을 클릭하면 인증키를 사용해서 공공 데이터 센터에서 데이터를 파싱 해올 업데이트 버튼과, 파싱 해온 데이터를 excel파일로 저장할 수 있는 파일 저장 버튼, 그리고 프로그램을 종료시킬 종료 버튼을 만든다. 오른쪽에는 업데이트 버튼을 눌렀을 때, 진행상황을 확인할 수 있도록 텍스트 박스와 프로세스 확인 라벨을 배치한다.
import 라이브러리 추가

class read_api:
    def __init__(self):
        Tk 객체 생성 및 설정

        '''
        버튼, 라벨, 입력
        '''
        malgun12_bold = "malgun", 10, "bold"

        self.lb_myapi = Label(text="인증키", font=malgun12_bold)
        self.lb_myapi.place(x=20, y=360)
        self.myapi = Entry(self.main_window, width=10, textvariable=str)
        self.myapi.insert(0, '')
        self.myapi.place(x=75, y=360)

        self.label = Label(text="프로세스확인", font=malgun12_bold)
        self.label.place(x=320, y=340)
        self.progress = Text(self.main_window, width=11, height=3)
        self.progress.configure(font=("Arial", 8, "bold"))
        self.progress.place(x=320, y=370)
        self.text_index = 1.0

        self.btn_update = Button(self.main_window, text="업데이트", font=malgun12_bold, command=self.fn_file_update, repeatdelay=1000)
        self.btn_update.place(x=20, y=390)
        self.btn_save = Button(self.main_window, text="파일저장", font=malgun12_bold, command=self.fn_file_save, repeatdelay=1000)
        self.btn_save.place(x=100, y=390)
        self.btn_exit = Button(self.main_window, text="종      료", font=malgun12_bold, command=self.fn_exit, repeatdelay=1000)
        self.btn_exit.place(x=180, y=390)

        self.main_window.mainloop()

    def fn_file_update(self):
        self.main_window.destroy()

    def fn_file_save(self):
        self.main_window.destroy()

    def fn_exit(self):
        self.main_window.destroy()

read_api()
배치 위치를 확인한다.

업데이트 버튼을 눌렀을 때 동작할 fn_file_update() 함수를 작성한다. 버튼을 눌렀을 때 진행상황을 출력하기 위해 index와 출력 메시지를 설정한다. update() 함수를 호출하면 해당 시점까지의 상황을 Tk객체에 업데이트해주기 때문에 진행상황 메시지가 출력될 수 있도록 두 번 호출한다.
import 라이브러리 추가

class read_api:
    def __init__(self):
        init 함수 작성

    def fn_file_update(self):
            self.progress.delete(1.0, END)
            self.progress.insert(self.text_index, 'load file ...\n')
            self.text_index = self.text_index + 1.0
            self.main_window.update()

            self.progress.insert(self.text_index, 'fin')
            self.text_index = self.text_index + 1.0
            self.main_window.update()

	def fn_file_save(self):
        self.main_window.destroy()

    def fn_exit(self):
        self.main_window.destroy()
업데이트 버튼을 클릭해보면 출력되는 내용을 확인한다.

이전 글의 사진 4에서 서비스 정보-참고 문서를 다운로드한다. 문서를 보면 서비스 url과 요청 변수에 대한 명세가 나와있는 페이지가 있다.

이제 출력문 사이에 동작 내용을 작성하면 된다. 사진 3에서 만들었던 인증키 텍스트 박스의 값을 myservicekey에 저장한다. 이렇게 해야 인증키 텍스트 박스에 api 인증키를 입력하고 업데이트 버튼을 클릭하면 사용자의 인증키로 api 데이터를 받아올 수 있다. requests 라이브러리를 사용해서 서비스 url에 요청 변수를 같이 요청해서 데이터를 받아온다.
import 라이브러리 추가

class read_api:
    def __init__(self):
        init 함수 작성

    def fn_file_update(self):
        출력문

        '''
        call corona api
        '''
        url = 'http://openapi.data.go.kr/openapi/service/rest/Covid19/getCovid19InfStateJson'
        myservicekey = self.myapi.get()

        params ={'serviceKey' : myservicekey,
                 'pageNo' : '1',
                 'numOfRows' : '10',
                 'startCreateDt' : '20220101',
                 'endCreateDt' : self.date }

        response = requests.get(url, params=params)
        content = response.text

        출력문

    def fn_file_save(self):
    	self.main_window.destroy()

    def fn_exit(self):
        self.main_window.destroy()
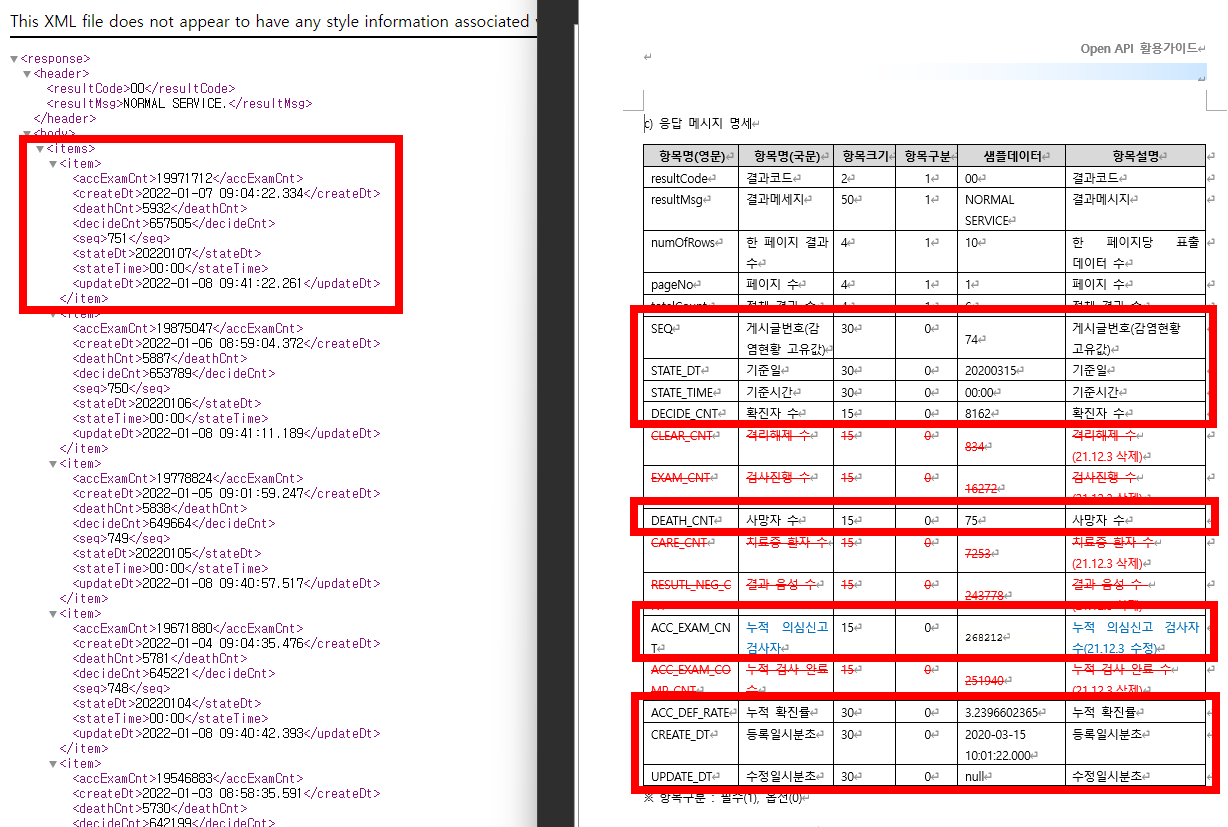
이전 글의 사진 4에서 활용신청 상세 기능정보의 미리 보기-확인을 누르면 요청 변수를 입력할 수 있고 입력한 요청 변수에 대한 데이터를 볼 수 있다. 사진 6과 동일하게 요청 변수를 입력하고 미리 보기 버튼을 눌러서 데이터를 확인한다.

<item> 태그에 9개의 값이 들어있으며, 자세한 정보는 서비스 정보-참고 문서에서 응답 메시지 명세를 확인해보면 된다.
BeautifulSoup를 사용해서 item 태그를 찾는다. 데이터 값과 데이터 칼럼명을 저장할 row와 col 리스트를 만들어서 각각 저장한다.
import 라이브러리 추가

class read_api:
    def __init__(self):
        init 함수 작성

    def fn_file_update(self):
        출력문
        call corona api

        '''
        xml to list
        '''
        xml = BeautifulSoup(content,'lxml-xml')
        rows = xml.findAll('item')

        row  = []
        col  = []

        for i in range(0, len(rows)):
            value=[]
            columns = rows[i].find_all()

            for j in range(0,len(columns)):
                if i ==0:
                    col.append(columns[j].name)
                value.append(columns[j].text)

            row.append(value)

        출력문

    def fn_file_save(self):
    	self.main_window.destroy()

    def fn_exit(self):
        self.main_window.destroy()
rows, row, col값은 다음과 같다.

row와 col을 사용해서 데이터 프레임 형식으로 만든다. 이는 파일로 저장하기 위함으로, 칼럼명을 변환한 다음 사진 3에서 만들었던 self.save_corona에 담아주면 업데이트 버튼에 대한 함수 작성이 끝난다.
import 라이브러리 추가

class read_api:
    def __init__(self):
        init 함수 작성

    def fn_file_update(self):
        출력문
        call corona api
        xml to list

        '''
        save list... to excel
        '''
        corona = pd.DataFrame(row, columns=col)
        corona.rename(columns={ 'accDefRate' : '누적확진률', 'accExamCnt' : '누적검사수',  'createDt' : '등록일시분초',
                                'deathCnt' : '사망자수',     'decideCnt' : '확진자수',    'seq' : '감염현황고유값',
                                'stateDt' : '기준일',        'stateTime' : '기준시간',    'updateDt' : '수정일시분초'
                              }, inplace=True)

        self.save_corona = corona.reindex(columns=['기준일', '누적검사수', '누적확진률',
                                                   '확진자수', '사망자수', '감염현황고유값',
                                                   '기준시간', '등록일시분초', '수정일시분초'])

        출력문

    def fn_file_save(self):
    	self.main_window.destroy()

    def fn_exit(self):
        self.main_window.destroy()
corona칼럼을 처리한 결과는 다음과 같다.

파일 저장 버튼에 대한 함수도 구현한다. 업데이트 저장 버튼과 마찬가지로 버튼을 눌렀을 때 진행상황을 출력할 수 있도록 하고 파일을 저장할 경로를 설정한 다음, 사진 11에서 마지막으로 저장했던 self.save_corona를 엑셀로 저장한다.
import 라이브러리 추가

class read_api:
    def __init__(self):
        init 함수 작성

    def fn_file_update(self):
        출력문
        call corona api
        xml to list
        save list... to excel
        출력문

    def fn_file_save(self):
    	출력문

        '''
        파일 저장
        '''
        base_dir  = './'
        file_name = 'corona_'+self.date+'.xlsx'
        file_dir  = os.path.join(base_dir, file_name)
        self.save_corona.to_excel(file_dir, na_rep='NaN', header=True, index=False, startrow=0, startcol=0)

        출력문

    def fn_exit(self):
        self.main_window.destroy()
마지막으로 종료 버튼에 대한 함수는 종료 버튼을 클릭하면 Tk() window를 제거하면서 프로그램이 종료될 수 있도록 구현한다.
import 라이브러리 추가

class read_api:
    def __init__(self):
        init 함수 작성

    def fn_file_update(self):
        출력문
        call corona api
        xml to list
        save list... to excel
        출력문

    def fn_file_save(self):
    	출력문
        파일 저장
        출력문

    def fn_exit(self):
        self.main_window.destroy()
이렇게 작성한 프로그램의 실행결과를 보면 다음과 같다.
업데이트 버튼

파일저장 버튼

생성된 파일

전체코드
import requests
import xml.etree.ElementTree as et
from bs4 import BeautifulSoup
from lxml import html

import tkinter.filedialog as fd
from tkinter import *
from tkinter import messagebox

import os
import pandas as pd
import datetime

class read_api:
    def __init__(self):
        self.main_window = Tk()
        self.main_window.title("read api program")
        self.main_window.geometry("517x432")
        self.main_window.resizable(False, False)
        label_image = PhotoImage(file = './bg.png')
        bg_label = Label(self.main_window, image=label_image)
        bg_label.place(x=0, y=0)

        self.save_corona = []
        self.date = datetime.datetime.today().strftime("%Y%m%d")

        '''
        버튼, 라벨, 입력
        '''
        malgun12_bold = "malgun", 10, "bold"

        self.lb_myapi = Label(text="인증키", font=malgun12_bold)
        self.lb_myapi.place(x=20, y=360)
        self.myapi = Entry(self.main_window, width=10, textvariable=str)
        self.myapi.insert(0, '')
        self.myapi.place(x=75, y=360)

        self.label = Label(text="프로세스확인", font=malgun12_bold)
        self.label.place(x=320, y=340)
        self.progress = Text(self.main_window, width=11, height=3)
        self.progress.configure(font=("Arial", 8, "bold"))
        self.progress.place(x=320, y=370)
        self.text_index = 1.0

        self.btn_update = Button(self.main_window, text="업데이트", font=malgun12_bold, command=self.fn_file_update, repeatdelay=1000)
        self.btn_update.place(x=20, y=390)
        self.btn_save = Button(self.main_window, text="파일저장", font=malgun12_bold, command=self.fn_file_save, repeatdelay=1000)
        self.btn_save.place(x=100, y=390)
        self.btn_exit = Button(self.main_window, text="종      료", font=malgun12_bold, command=self.fn_exit, repeatdelay=1000)
        self.btn_exit.place(x=180, y=390)

        self.main_window.mainloop()

    def fn_file_update(self):
        self.progress.delete(1.0, END)
        self.progress.insert(self.text_index, 'load file ...\n')
        self.text_index = self.text_index + 1.0
        self.main_window.update()

        '''
        call corona api
        '''
        url = 'http://openapi.data.go.kr/openapi/service/rest/Covid19/getCovid19InfStateJson'
        myservicekey = self.myapi.get()

        params ={'serviceKey' : myservicekey,
                 'pageNo' : '1',
                 'numOfRows' : '10',
                 'startCreateDt' : '20220101',
                 'endCreateDt' : self.date }

        response = requests.get(url, params=params)
        content = response.text

        '''
        xml to list
        '''
        xml = BeautifulSoup(content,'lxml-xml')
        rows = xml.findAll('item')

        row  = []
        col  = []

        for i in range(0, len(rows)):
            value=[]
            columns = rows[i].find_all()

            for j in range(0,len(columns)):
                if i ==0:
                    col.append(columns[j].name)
                value.append(columns[j].text)

            row.append(value)

        '''
        save list... to excel
        '''
        corona = pd.DataFrame(row, columns=col)
        corona.rename(columns={ 'accDefRate' : '누적확진률', 'accExamCnt' : '누적검사수',  'createDt' : '등록일시분초',
                                'deathCnt' : '사망자수',     'decideCnt' : '확진자수',    'seq' : '감염현황고유값',
                                'stateDt' : '기준일',        'stateTime' : '기준시간',    'updateDt' : '수정일시분초'
                              }, inplace=True)

        self.save_corona = corona.reindex(columns=['기준일', '누적검사수', '누적확진률',
                                                   '확진자수', '사망자수', '감염현황고유값',
                                                   '기준시간', '등록일시분초', '수정일시분초'])

        self.progress.insert(self.text_index, 'fin')
        self.text_index = self.text_index + 1.0
        self.main_window.update()

    def fn_file_save(self):
        self.progress.delete(1.0, END)
        self.progress.insert(self.text_index, 'file save ...\n')
        self.text_index = self.text_index + 1.0
        self.main_window.update()

        '''
        파일 저장
        '''
        base_dir  = './'
        file_name = 'corona_'+self.date+'.xlsx'
        file_dir  = os.path.join(base_dir, file_name)

        self.save_corona.to_excel(file_dir, na_rep='NaN', header=True, index=False, startrow=0, startcol=0)
        self.progress.insert(self.text_index, 'fin')
        self.text_index = self.text_index + 1.0
        self.main_window.update()

    def fn_exit(self):
        self.main_window.destroy()

read_api()
여기까지 공공 데이터 파싱을 위한 코드 작성이 끝난다. 다음 글에서는 코드를 exe파일로 변환하는 법에 대해 작성하려고 한다.
'공부 > python' 카테고리의 다른 글
| [Pytesseract를 사용한 메이플스토리 길드 스코어 분석] 필요한 라이브러리 설치 (0) | 2022.03.27 |
|---|---|
| [Pytesseract를 사용한 메이플스토리 길드 스코어 분석] 프로그램 소개 (0) | 2022.03.24 |
| [공공 데이터 파싱 프로그램 만들기] pyinstaller로 .exe파일 생성 (0) | 2022.01.08 |
| [공공 데이터 파싱 프로그램 만들기] 공공데이터포털 등록과정 (0) | 2022.01.02 |
| [공공 데이터 파싱 프로그램 만들기] 소개 (0) | 2022.01.02 |


댓글