1. zxing dependency 추가하기
2. 예제코드 작성
3. 화면 확인
진행중인 프로젝트에서 QR Image를 생성해야 할 일이 생겼다.
라이브러리만 찾으면 금방 끝나지 않을까 해서 관련 라이브러리를 찾아볼려고 했는데...
근데 뭐 멀리 찾아볼 필요도 없이 구글신께서 만드신 zxing이라는 라이브러리가 있다나? 거기다 무려 오픈소스!
바로 예제코드 작성해봅시다.
1. zxing dependency 추가하기
먼저 zxing 깃허브를 들어가봤다.
https://github.com/zxing/zxing
GitHub - zxing/zxing: ZXing ("Zebra Crossing") barcode scanning library for Java, Android
ZXing ("Zebra Crossing") barcode scanning library for Java, Android - GitHub - zxing/zxing: ZXing ("Zebra Crossing") barcode scanning library for Java, Android
github.com
영어는 무서워...
잘 모르겠지만 일단 내가 필요한 zxing 모듈은 core/랑 javase/ 두 개만 있으면 될 것 같다.

maven repository 사이트에 들어가서 zxing을 검색합시다. 근데 이거 왜 링크 페이지가 안 생기는걸까...
아무튼 들어가서 zxing이라고 검색해보면 zxing core와 zxing java se extention이 있다.
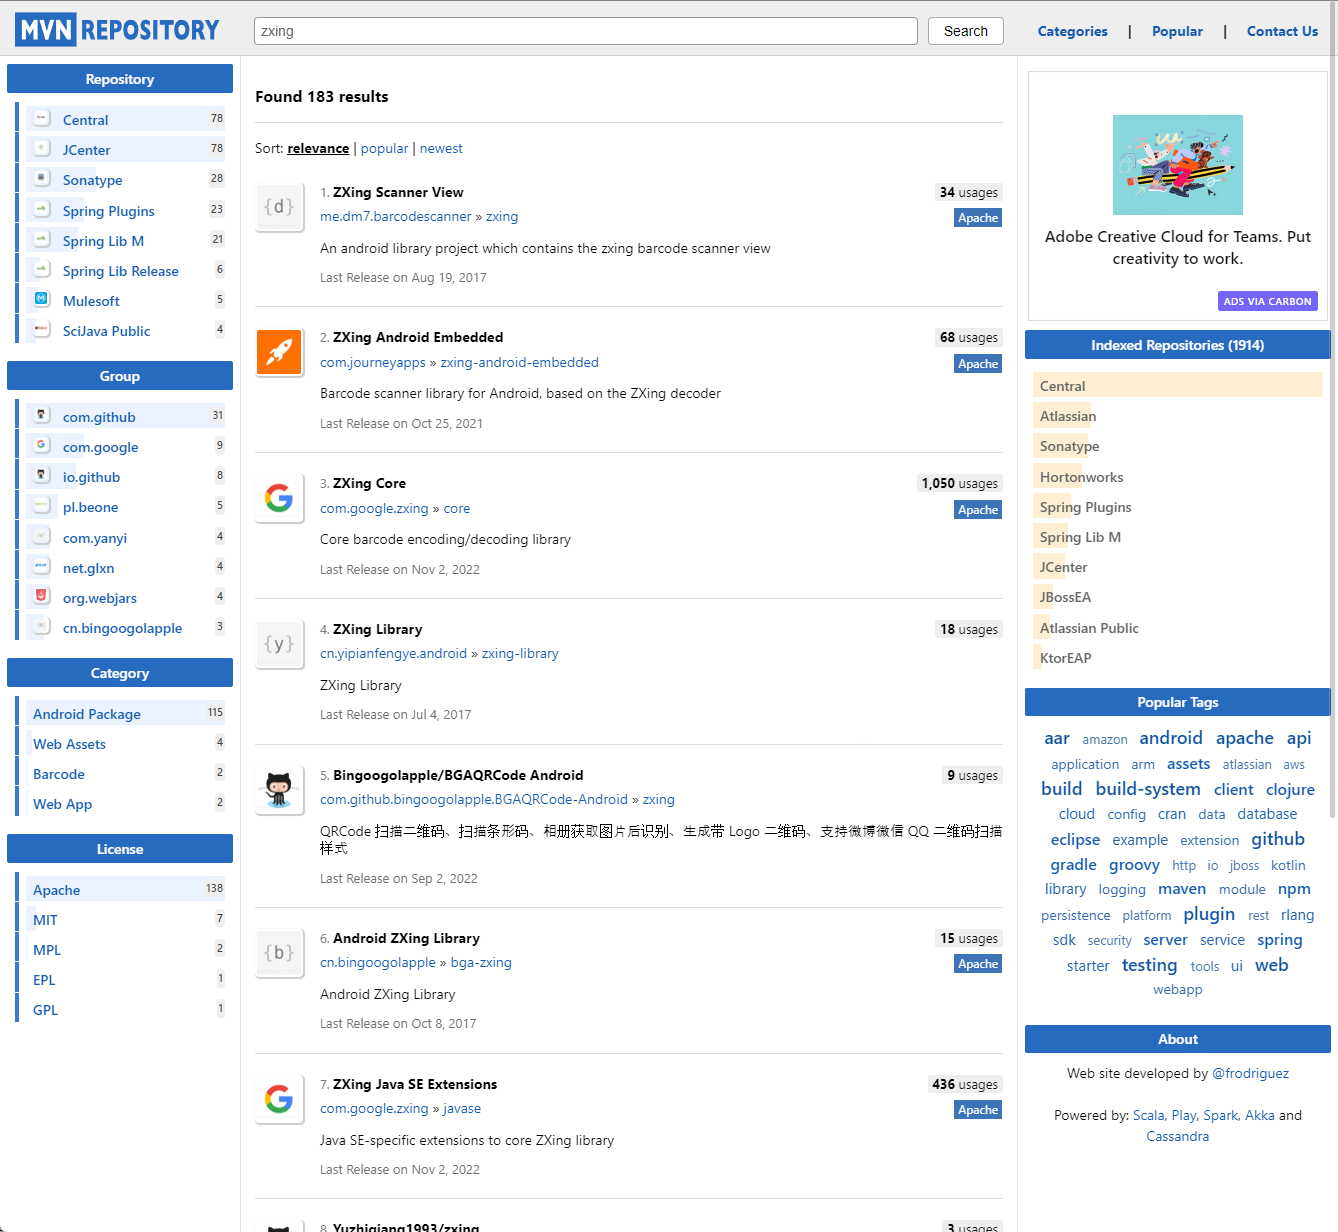
core 들어가서 가장 최신버전을 선택하자.
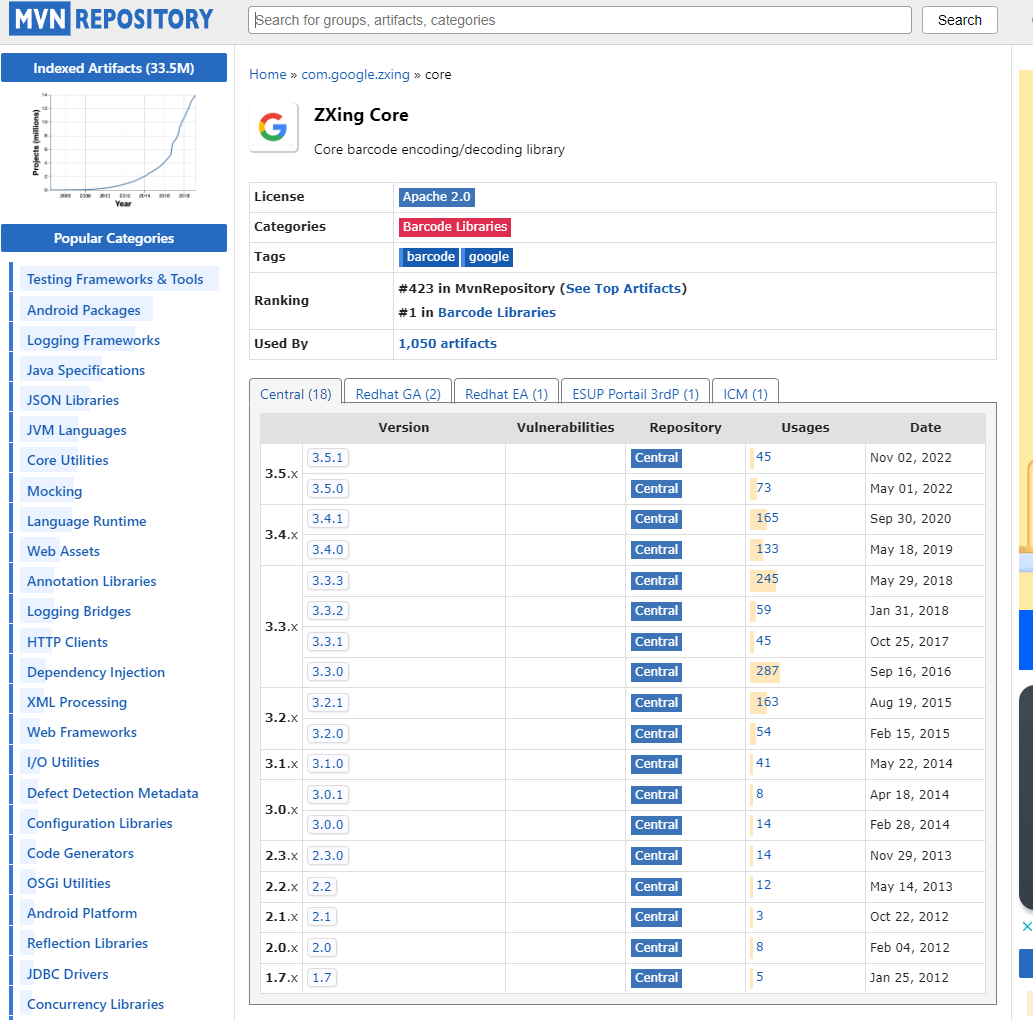
복사!

마찬가지로 Java SE Extensions 들어가서 가장 최신버전 선택

복사!

복사한 내용을 build.gradle에 붙여넣자.
Visual studio code는 build.gradle 내용이 변경되면 오른쪽 하단에 알림이 나오는데 Yes 클릭해주자.

추가된거 확인

귀찮으면 붙여넣기
/* QR code zxing */
implementation 'com.google.zxing:core:3.5.1'
implementation 'com.google.zxing:javase:3.5.1'
2. 예제코드 작성
스프링 부트에서 QR 이미지를 생성해보는 예제코드를 작성해보자.
먼저 컨트롤러를 작성한다.
package mh.qr.mh.controller;
import org.springframework.stereotype.Controller;
import org.springframework.web.bind.annotation.GetMapping;
import lombok.extern.slf4j.Slf4j;

@Slf4j
@Controller
public class QRPageController {
    @GetMapping(value = "/qr/insert")
    public String insertQR() throws Exception {
        log.info("make!");
        return "/make";
    }
}
컨트롤러에서 호출할 make.html를 작성한다.
예제에서는 axios를 사용해서 데이터를 보내지만 form을 사용해서 보내도 된다.
여기까지 중요한 내용은 없으니 <div id=MakeQRCode> ... </div>의 input id만 잘 기억해두자.
<!DOCTYPE HTML>
<html xmlns:th="http://www.thymeleaf.org">
<head>
    <meta charset="utf-8" http-equiv="Content-Security-Policy" content="upgrade-insecure-requests">
    <title>QR SHOW TEST</title>
    <link rel="stylesheet" href="/css/make.css" />
</head>

<body>
    <hr id="sep">
    <div id="menuBtn"> <div id="btnLeft"> <img src="/logo.gif"> </div> </div>
    <div class="subTitle"> <p style="font-size:30px;">QR make!</p> </div>
    <div id="MakeQRCode">
        <div class="first" id="MakeQRCodeDiv">
            <label>첫 번째</label>
            <input  type="text" id="first"
                                placeholder="첫 번째 입력"
                                onfocus="this.placeholder=''"
                                onblur="this.placeholder='첫 번째 입력'">
            </div>
            <div class="second" id="MakeQRCodeDiv">
                <label>두 번째</label>
                <input  type="text" id="second"
                                    placeholder="두 번째 입력"
                                    onfocus="this.placeholder=''"
                                    onblur="this.placeholder='두 번째 입력'">
            </div>
            <div class="third" id="MakeQRCodeDiv">
                <label>세 번째</label>
                <input  type="text" id="third"
                                    placeholder="세 번째 입력"
                                    onfocus="this.placeholder=''"
                                    onblur="this.placeholder='세 번째 입력'">
            </div>
            <input type="button" id="targetBtn" value="생성" onclick="QRInsertDatabase();">
    </div>

    <script src="/js/axios.min.js"></script>
    <script src="/js/jquery.min.js"></script>
    <script src="/js/function.js"></script>
</body>

</html>
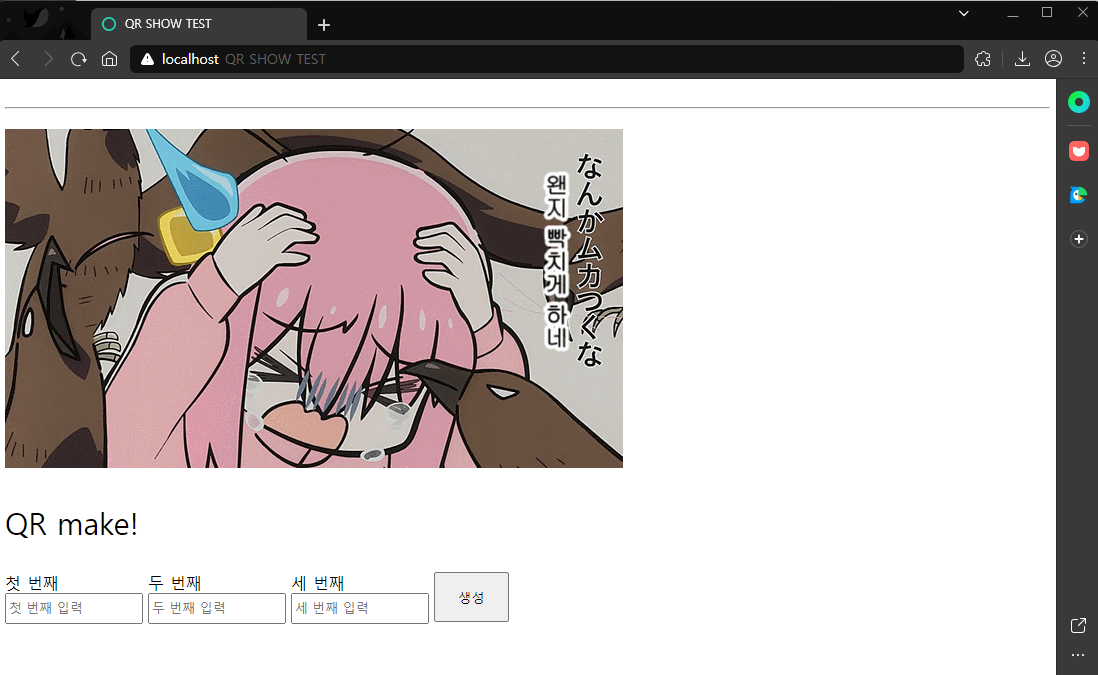
http://localhost/qr/insert > 화면 확인
생성 버튼에 대한 핸들러 함수를 function.js에 작성하자.
예제에서는 axios를 사용했지만 ajax로 구현해도 되고 html에서 form을 사용해도 된다.
/**************** 전역변수 ****************/
// axios ... server base url
let urlPre = "https://localhost";


/**************** 생성 ****************/
function QRInsertDatabase(){
    console.log("qr insert database!");
    // 작성할 api 컨트롤러 매핑
    let url = urlPre+'/api/qr/insertqr';

    // 입력된 값들 가져오기
    let first = document.getElementById("first").value;
    let second = document.getElementById("second").value;
    let third = document.getElementById("third").value;

    // 데이터가 비어있으면 default 값으로 채워줌
    if (first == ""){
        first = "1"
    }
    if (second == ""){
        second = "2"
    }
    if (third == ""){
        third = "3"
    }

    // 입력칸 비우기
    document.getElementById("first").value = '';
    document.getElementById("second").value = '';
    document.getElementById("third").value = '';

    axios.get( url, { params:{ first : first, second : second, third : third }})
}
QR 생성 api 컨트롤러를 작성한다.
예제코드에서는 Map 객체에 담긴 first, second, third를 하나의 일련번호로 만들어서 서비스 메서드에 넘겨줬다.
package mh.qr.mh.controller;
import java.io.IOException;
import java.util.Map;
import org.springframework.web.bind.annotation.*;
import com.google.zxing.WriterException;
import lombok.extern.slf4j.Slf4j;
import mh.qr.mh.service.qrService;

@Slf4j
@CrossOrigin(origins = "*", allowedHeaders = "*") /* CORS 어노테이션 */
@RestController
public class QRApiController {

    private final qrService qrService;

    public QRApiController(
            qrService qrService) {
        this.qrService = qrService;
    }

    @GetMapping(value = "/api/qr/insertqr")
    public void insertQRData(
            @RequestParam Map<String, String> qrMap) throws WriterException, IOException {
        log.info("qr insert!");

        String targetSep = "$";
        String target = qrMap.get("first") + targetSep + qrMap.get("second") + targetSep + qrMap.get("third");

        // qr image 생성
        qrService.QRMake(target);
    }
}
서비스를 만들기 위해 서비스 인터페이스를 만들어고...
package mh.qr.mh.service;
import java.io.IOException;
import com.google.zxing.WriterException;

public interface qrServiceI {
    public abstract void QRMake(String target) throws WriterException, IOException;
}
드디어 QR을 생성하는 코어 로직이다.
그냥 자바로 글을 썼으면 진작 끝났을 것을 괜히 스프링으로 보여주겠다고 작성해야 할 것만 늘었다.
봐줄사람도 없는데.
아무튼 코드는 zxing 예제코드랑 거의 비슷...할... 것 같다.
이게 내가 짠 게 아니라 어디선가 가져오긴 했는데 기억이 안난단 말이지...?
로직 전체를 볼 필요는 없고 저장할 경로와 이미지 크기, 이미지 색 정도만 보면 된다.
주석으로 처리해뒀으니 필요한 부분만 확인하면 된다.
package mh.qr.mh.service;
import java.awt.Color;
import java.awt.Graphics2D;
import java.awt.image.BufferedImage;
import java.io.File;
import java.io.IOException;
import java.util.EnumMap;
import java.util.Map;
import javax.imageio.ImageIO;
import org.springframework.stereotype.Service;
import com.google.zxing.BarcodeFormat;
import com.google.zxing.EncodeHintType;
import com.google.zxing.WriterException;
import com.google.zxing.common.BitMatrix;
import com.google.zxing.qrcode.QRCodeWriter;
import lombok.extern.slf4j.Slf4j;

@Slf4j
@Service
public class qrService implements qrServiceI {
    private final String sep = File.separator;

    public void QRMake(String target) throws WriterException, IOException {
        // https://stackoverflow.com/questions/10142748/reduce-border-width-on-qr-codes-generated-by-zxing
        log.info("connect qr make!");

        // 파일경로설정
        String crunchifyFileType = "jpg"; //파일 확장자
        String filePath = System.getProperty("user.dir") + sep + "src" + sep + "main" + sep + "resources" + sep + "static" + sep + "qrImg" + sep + target + ".jpg";

        File crunchifyFile = new File(filePath);
        Map<EncodeHintType, Object> crunchifyHintType = new EnumMap<>(EncodeHintType.class);
        crunchifyHintType.put(EncodeHintType.CHARACTER_SET, "UTF-8");
        crunchifyHintType.put(EncodeHintType.MARGIN, 1); /* default = 4 */

        int size = 256; // 이미지 크기
        QRCodeWriter mYQRCodeWriter = new QRCodeWriter(); // throws com.google.zxing.WriterException
        BitMatrix crunchifyBitMatrix = mYQRCodeWriter.encode(target, BarcodeFormat.QR_CODE, size, size,
                crunchifyHintType);
        int CrunchifyWidth = crunchifyBitMatrix.getWidth();
        int CrunchifyHeight = crunchifyBitMatrix.getWidth();

        BufferedImage crunchifyImage = new BufferedImage(CrunchifyWidth, CrunchifyHeight, BufferedImage.TYPE_INT_RGB);
        crunchifyImage.createGraphics();
        Graphics2D crunchifyGraphics = (Graphics2D) crunchifyImage.getGraphics();

        // 흰 배경 + 검은 코드
        crunchifyGraphics.setColor(Color.white); // 배경 색 설정
        crunchifyGraphics.fillRect(0, 0, CrunchifyWidth, CrunchifyHeight);
        crunchifyGraphics.setColor(Color.BLACK); // 코드 색 설정

        for (int i = 0; i < CrunchifyWidth; i++) {
            for (int j = 0; j < CrunchifyWidth; j++) {
                if (crunchifyBitMatrix.get(i, j)) {
                    crunchifyGraphics.fillRect(i, j, 1, 1);
                }
            }
        }

        ImageIO.write(crunchifyImage, crunchifyFileType, crunchifyFile);
        log.info("\nCongratulation.. You have successfully created QR Code.. \n" + "Check your code here: " + filePath);
    }
}
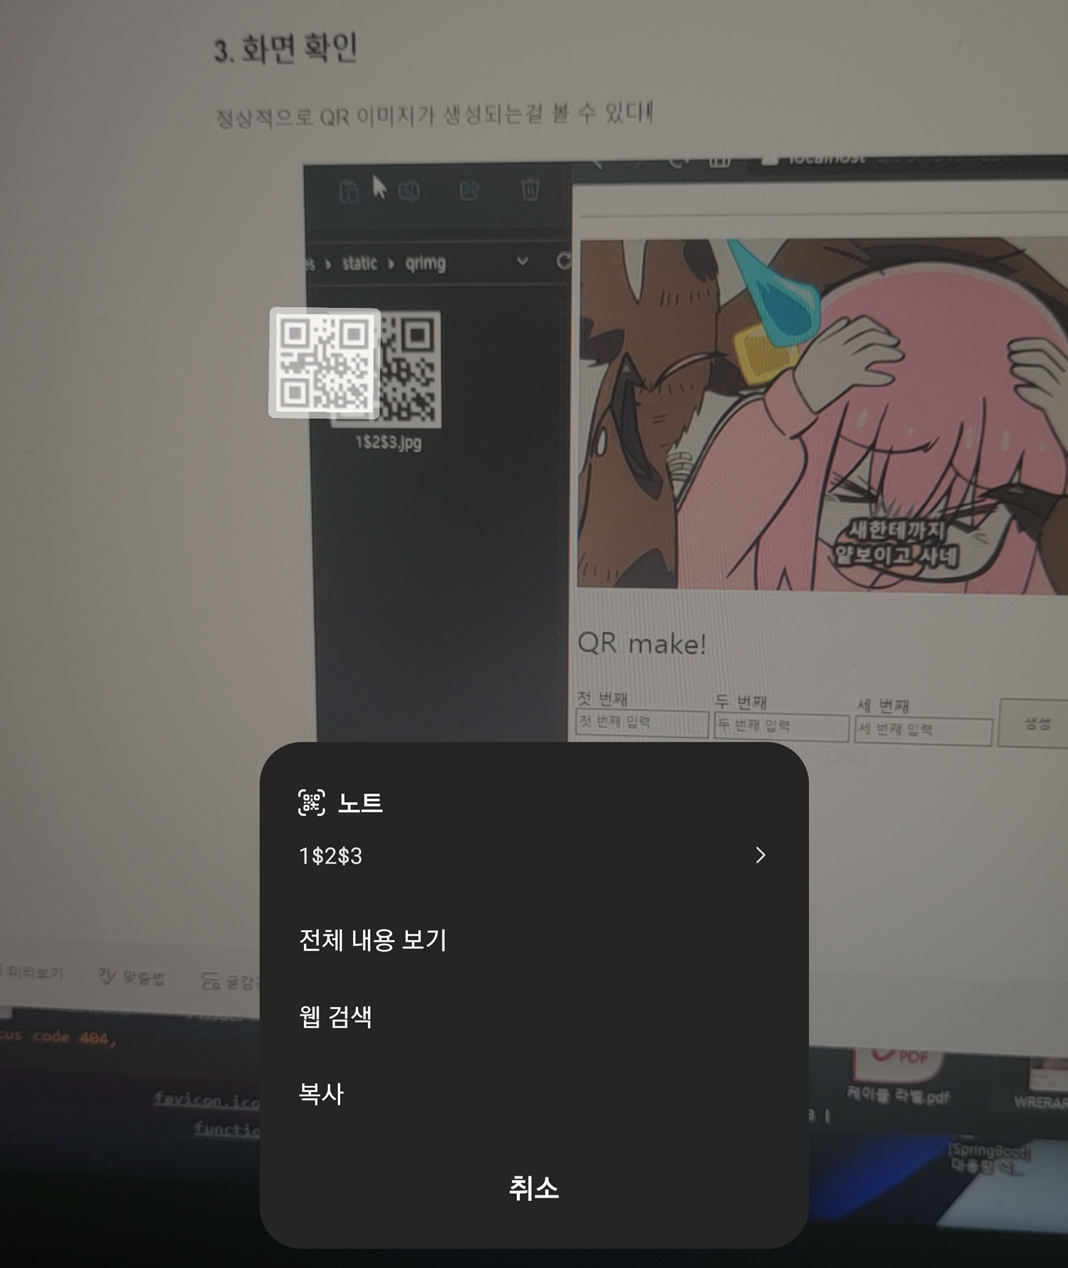
3. 화면 확인
정상적으로 QR 이미지가 생성되는걸 볼 수 있다!
QR 일련번호도 앱으로 찍어보면 정상적으로 출력된다.
움짤 이미지에 QR 리더를 찍어보면 확인할 수 있으니 궁금하면 해보자.
끝!
'공부 > java & Spring' 카테고리의 다른 글
| [Spring security] The type WebSecurityConfigurerAdapter is deprecated (0) | 2023.06.28 |
|---|---|
| [poi] Spring Boot 엑셀 다운로드 (java, gradle) (0) | 2023.06.23 |
| [Spring boot build error] visual studio code에서 갑자기 빌드 에러날때 (0) | 2023.05.22 |
| [403 Forbidden error] spring post method (axios post request) (1) | 2023.05.14 |
| [전자정부 프레임워크] 전자정부 프레임워크 스프링 부트 프로젝트 MariaDB 연동 후 데이터 출력까지 (0) | 2023.05.06 |


댓글